Register and Setup your Database for the Integration
The registration page will require:
- Organization Name
- Email Address
- Organization ID
- API Key
Once you have entered your Organization Name, Email Address, and Organization ID, TrueGivers will validate your information to confirm that you are a NeonCRM user. Then, you will be asked to enter your valid API Key. Next, TrueGivers will validate your API Key. Click Submit and you will receive an email with a temporary password to sign into your TrueGivers account.
Continue reading to view instructions on how to find your Organization ID and API Key. You can also view NeonCRM's full instructions here: NeonCRM Developer Guide: API Keys.
Organization ID
To access your Organization ID, first navigate to Settings > Organization Profile & Billing. The settings button is located at the top right of your NeonCRM homepage.
Next, scroll down until you find the section called Database Information. In this section you will find your Organization ID listed.
API Key
In NeonCRM, API Keys are based on NeonCRM system user accounts. We recommend creating a new user account for each integration you enable. Neon is asking you to create a new user that has API access, so they require an email address that is not already in use. You can use any email address not in use by Neon. This makes it easier to disable a single integration at a later time.
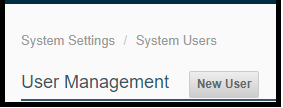
To access your Valid API Key, you will need to create one. You can create an API key in your Settings > User Management. Then click New User.
This will redirect you to a new user form. Fill out all required fields. We recommend naming this user with a name that includes 'TrueGivers API' or another name that will help you identify its use. Additionally, this user should have the User Group set to 'Administrator'. Selecting this type of User Group allows us to continue to process your data with limited interruptions.
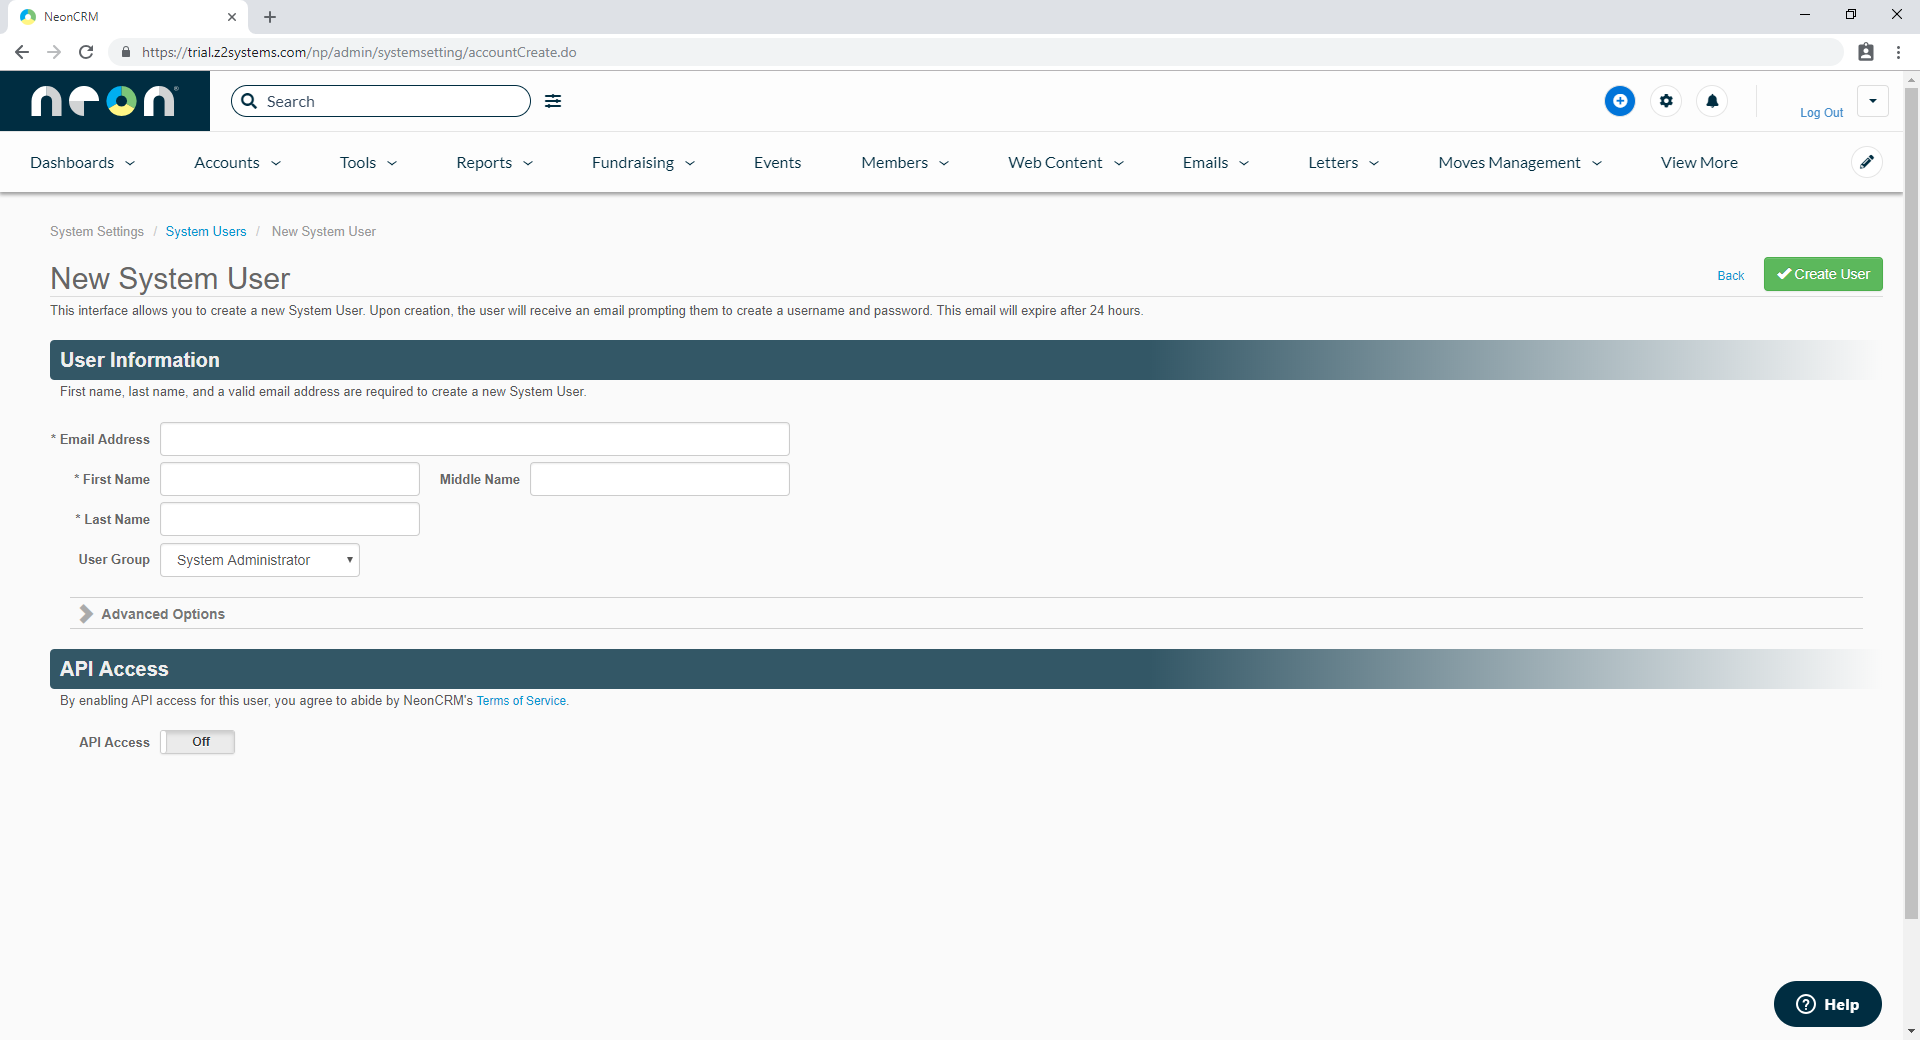
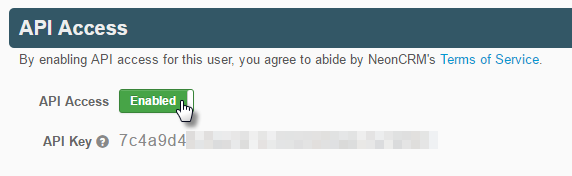
Then, enable the API Access for this user account by clicking the toggle button. Your API key will then be displayed.
Finally, click Create User at the top right of the New system user form. Your user will appear in the System Users list. You can always access your API Key by opening this System user. To remove API access for this integration, you can deactivate this user.
Account Last Modified Date check
TrueGivers requires that your accounts have the Account Last Modified Date field populated. This field is used during our download process, and lack of this value could prevent us from downloading ALL of your individual accounts.
Confirm that your accounts have this field populated by running a quick report within Neon.
- Click Reports > New Report
- Click All Accounts Report
- Click Edit Criteria
- Enter the following Criteria
- Field: Account Last Modified Date
- Operator: Blank

Account Last Modified Date Filter
- Click Load Criteria
- Finally, click Run Report.
If you are receiving results, this means that these accounts do not have the Account Last Modified Date field populated, and TrueGivers will NOT download these accounts. Continue below to find out how to populate this field: Populating the Account Last Modified Date.
If you are not receiving results, this means that all of your accounts have the Account Last Modified Date field populated. Congrats! You are now ready to register for the TrueGivers & NeonCRM Integration. Register now!
Populating the Account Last Modified Date.
There are a few steps you will need to take in order to populate your accounts that do not have the Account Last Modified Date populated.
- Create a new Custom Field (this can be deleted later)
- Perform a Bulk Edit Operation on all accounts missing Account Last Modified Date
- (optional) Delete Custom Field
Create A New Custom Field
In order to edit all accounts with the Account Last Modified Date field, you will need to perform a Bulk Operation on all of these accounts. The easiest way to do this is to create a new custom field.
For this example, we will name the new custom field 'Test'. This custom field name does not matter. Just use a name that is unique and you will remember when you perform the Bulk Edit. This field can also be deleted after you have performed the Bulk Edit.
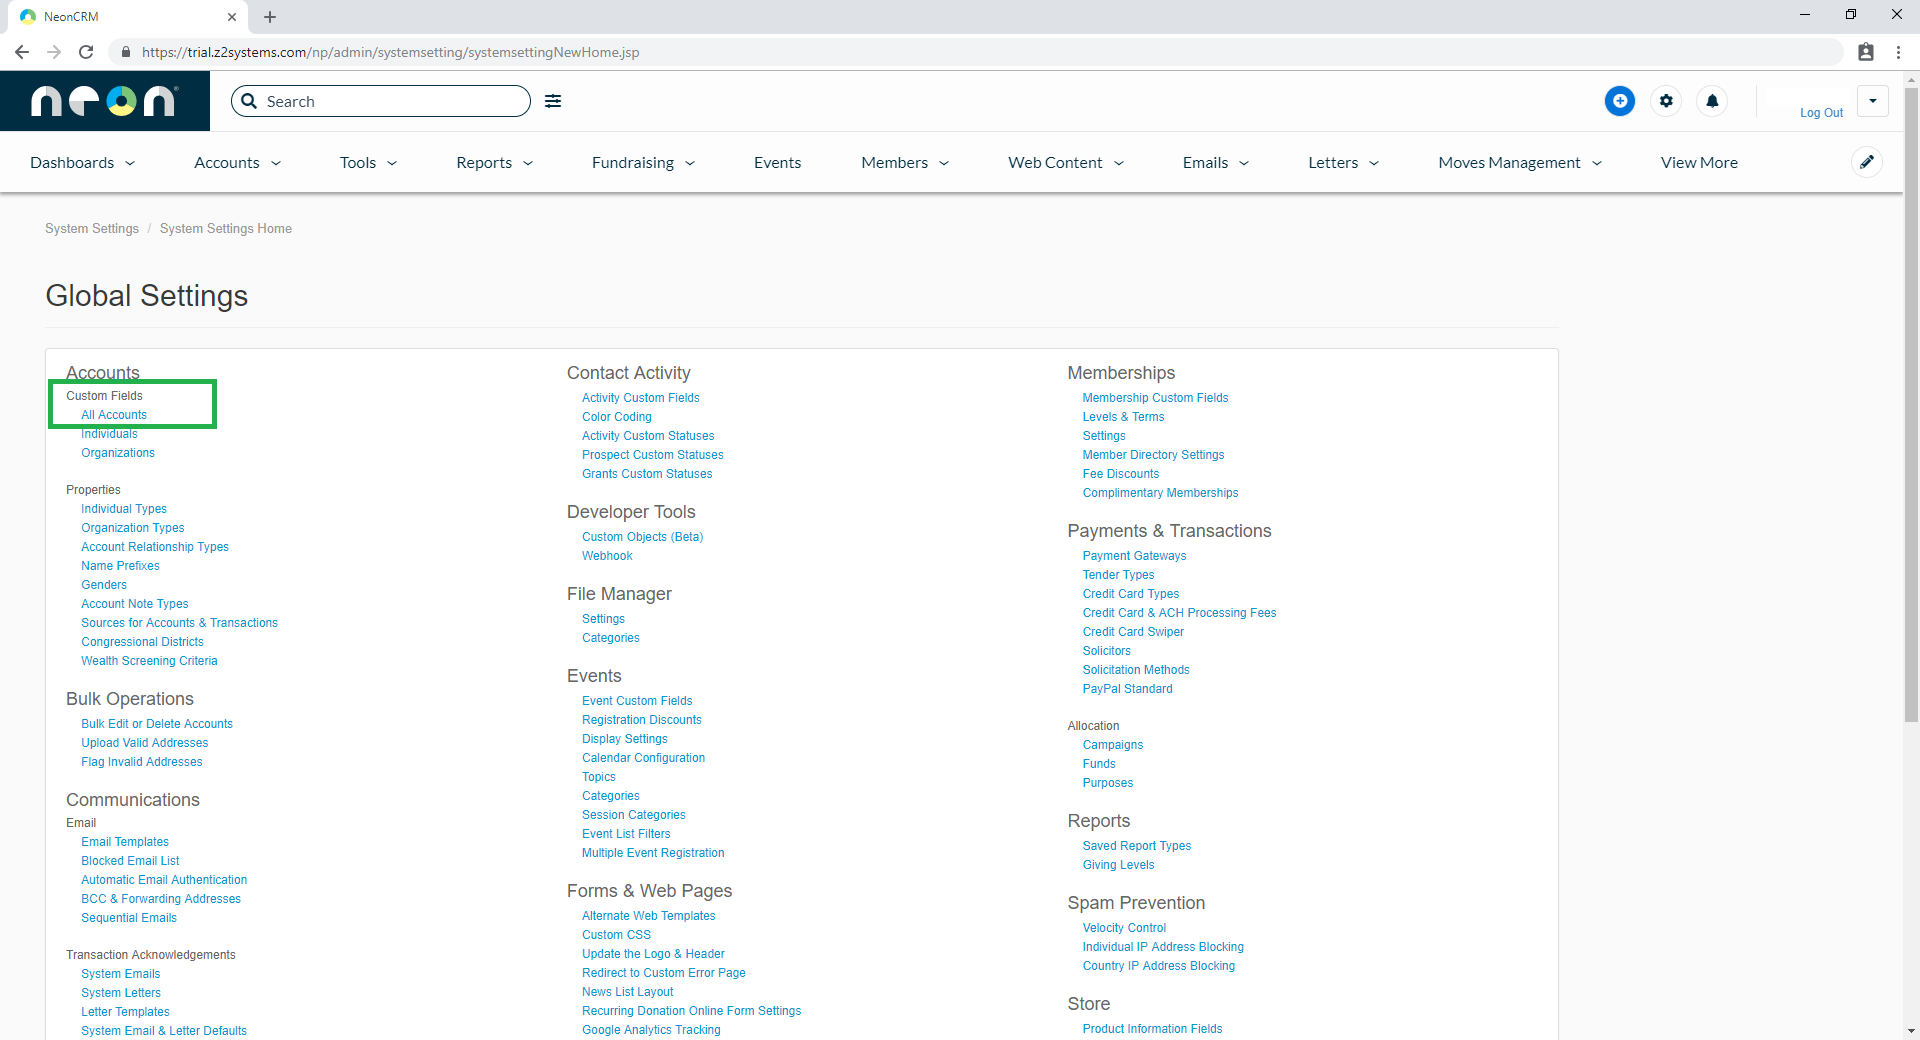
- Navigate to Settings > Global Settings
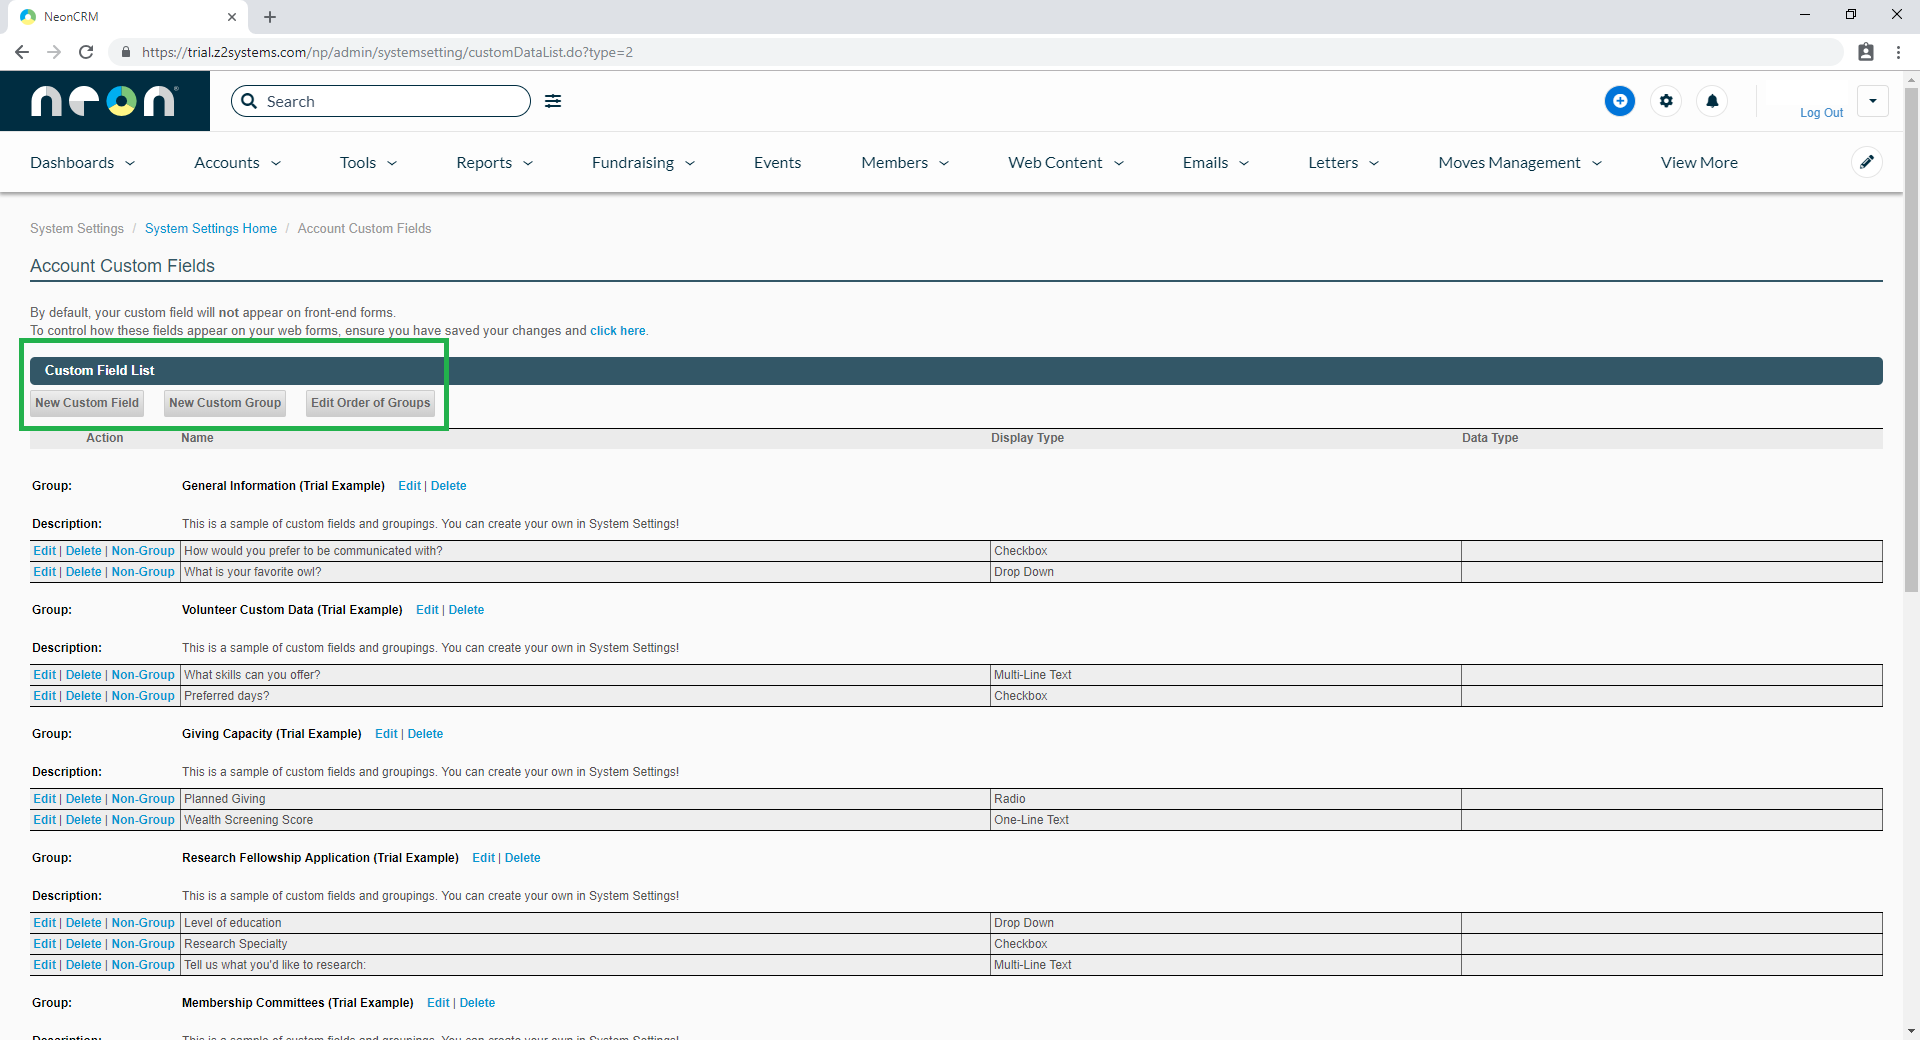
- Click All Accounts under the Accounts> Custom Fields section
- Click New Custom Field
- Field Name: Test
- Display type: one-line text
- Data type: text
- Then, click Save.
You have now created a custom field. Next, we will perform a bulk edit using this field.
Perform a Bulk Edit
Next, we will perform a Bulk Operation and edit the new 'Test' custom field. This will automatically populate the 'Account Last Modified Date' field.
To access the Bulk Operations, you'll need to click Setting > Global Settings> 'Bulk Edit or Delete Accounts'.
This will open up the 'All Accounts Report' which will enable you to create a report:
- Click Edit Criteria
- Enter the following Criteria
- Field: Account Last Modified Date
- Operator: Blank
Account Last Modified Date Filter
- Click Load Criteria
- Finally, click Run Report. This should return the same count as the first time you ran the All Accounts report above.
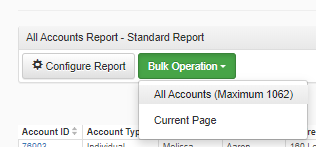
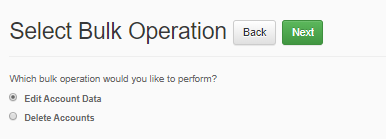
- Click Bulk Operation > All Accounts
Bulk Accounts Operation - Then, click Confirm Accounts
- Make sure the option is Edit Account Data, then click Next
Select Bulk Operation - Scroll down to find that new Custom Field you created and check this field.
- Then enter some data; for example: 'Test Field'

Test Field - At the top of the page, click Next
- Finally, this page should have a description like: Test will be changed to Test Field
- Click Confirm and Perform Bulk Edit button
Once this has completed, you can confirm the Account Last Modified Date field has been populated by running another report following the instructions above under Account Last Modified Date Check.
If you are not receiving results with that final check, this means that all of your accounts have the Account Last Modified Date field populated.
Congrats! You are now ready to register for the TrueGivers & NeonCRM Integration. Register now!
Registered Users
Once you have completed registration, TrueGivers will continue to automatically process your records on a daily basis. We will also update your Data Stewardship Dashboard when we find new data, which offers insights into the potential impact the data can have on your organization. The report also includes an analysis of cost savings you receive through a TrueGivers integration.

Registering for the TrueGivers & NeonCRM Integration does not include automatic synchronization, so you will not see new data in your NeonCRM database until you purchase credits. Additionally, some search features are disabled until you purchase. Continue reading to learn more about the purchasing process.
Purchase Whenever You Are Ready
To have your database automatically synchronized, purchase credits in TrueGivers. Follow these steps.
Purchase Credits
TrueGivers uses credits to streamline the purchasing process. One (1) credit is equal to $0.10. In the blue box on the Data Stewardship Dashboard, you will see a Purchase Credits button.

Clicking this button will open a purchase form. Select the pricing tier that corresponds with your credit count total.
In order for data to synchronize, you must purchase enough credits to cover all of the records in your NeonCRM database. Credits never expire, so you are welcome to purchase additional credits to cover additional months of service. You are always able to purchase credits through the Credits Counter located in the User Menu dropdown. This is located at the top right corner of your screen. Use the drop-down menu to choose the number of credits you would like to purchase.
Credits help us deliver uninterrupted service for our customers. Read more determining the right number of credits to purchase on our pricing page.
Apply Credits
After you purchase credits, we recommend you click the "Apply Credits" button to see your new data immediately. Clicking the Apply Credits button unlocks all TrueGivers features.

TrueGivers will ask you to confirm that you want to apply your credits. Click "OK" to do so. If you do not manually apply your credits, don't worry. TrueGivers will automatically apply your credits during nightly synchronization. After you Apply Credits, you will have access to all TrueGivers features and data until your account has insufficient credits.
Add Account Custom Fields and Custom Groups
To read NeonCRM's full instructions on Custom Fields: Configuring Custom Fields.
NeonCRM's Account Custom Fields enable you to collect and track any information not already available as standard account fields. These fields are not created automatically, so you will have to create them yourself. Adding these custom fields and groups to your NeonCRM account is not required. The integration will continue to work without these fields. However, to synchronize the deceased flags and demographic data to your accounts and receive the full experience of the integration, these fields must be present.
Follow these steps to create the account custom fields required for TrueGivers data. Then, continue to create account custom groups.
- Login to NeonCRM
- Navigate to Settings
- Navigate to Global Settings
- Click All Accounts, which is nested under the Custom Fields header under Accounts
Next, click New Custom Field.
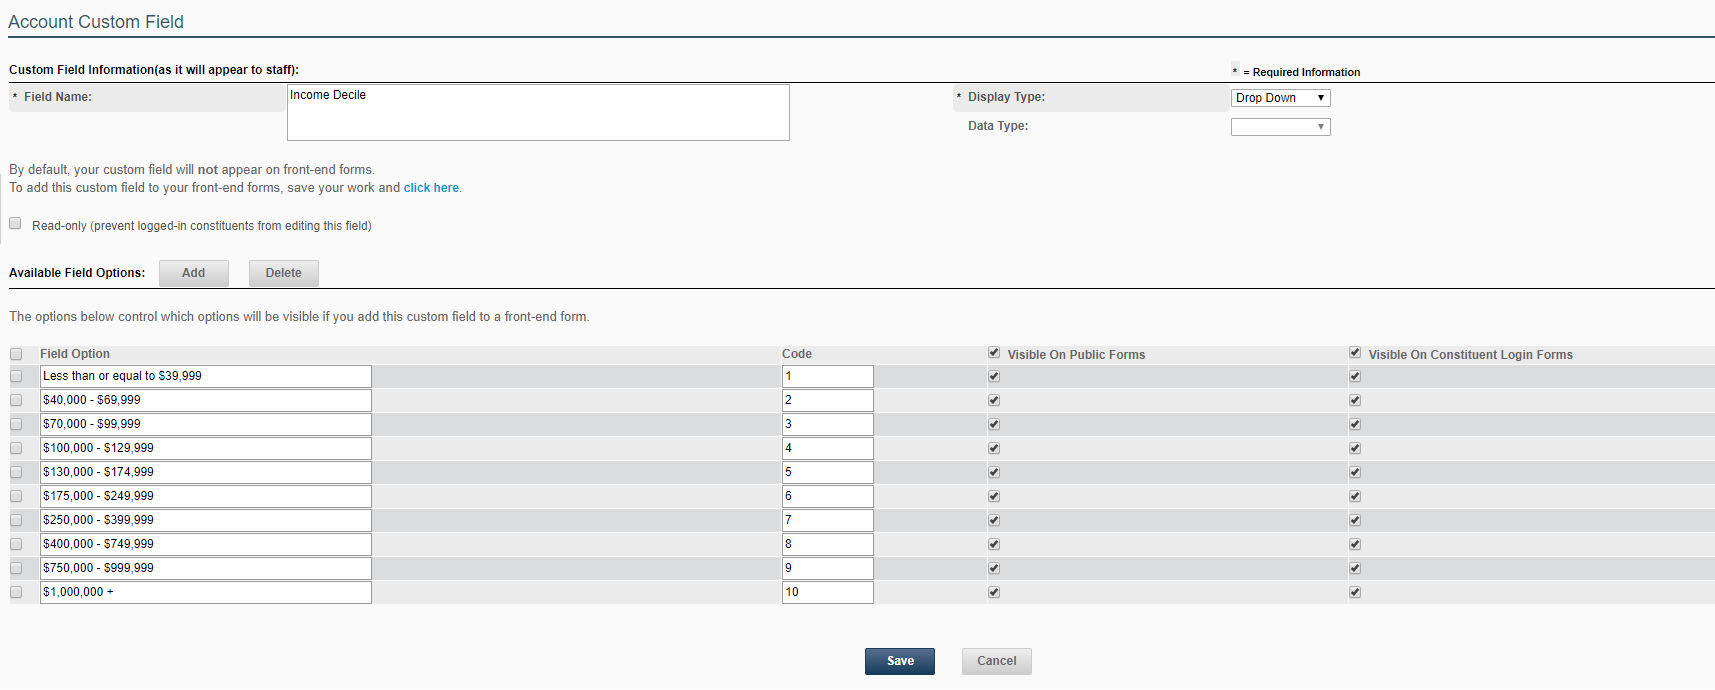
Then fill out the form with the Field Name and Display Type. When you create an Account Custom Field with the display type drop-down, you'll have to fill in the drop-down fields as well. NeonCRM refers to these drop-down fields as Field Options. In this example, we will use Income Decile. Once you have filled in all fields, you can click save.
When creating these custom fields, please make sure the custom field and its values are exactly as they are listed in the table below. Creating fields and values that vary from those listed will prevent those values from being synced.
Repeat all fields until they are saved. These will be saved at the bottom of the Account Custom Fields page in a section called Non-Grouped. Once you have created all custom fields listed above, you'll need to add them to their custom group. You will need to create two Custom Groups:
- TrueGivers Deceased Flag
- TrueGivers Demographics
To create a custom group, scroll to the top of the page and click New Custom Group.
Next, fill out the form with Display Name.
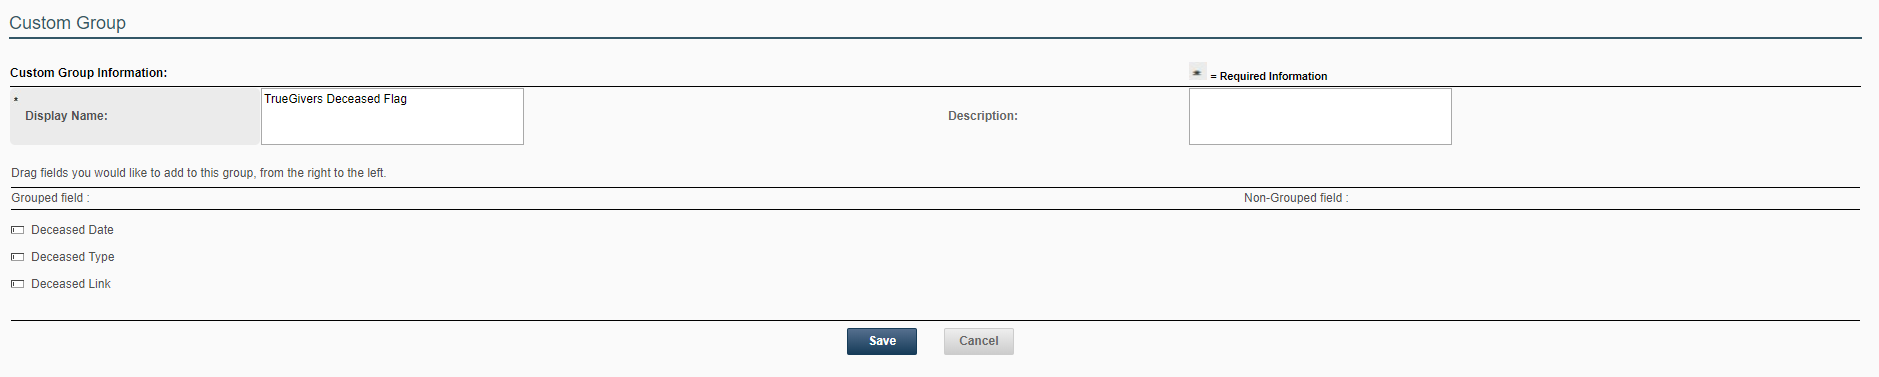
Before you click save, click any custom fields located in the Non-Grouped Field and drag it to the Grouped Field. Then click save. For example: TrueGivers Deceased Flag needs the Deceased Type, Deceased Link, and Deceased Date fields. You should click on each deceased field and drag it to the Grouped Field. The picture above shows how it should look when you click save.
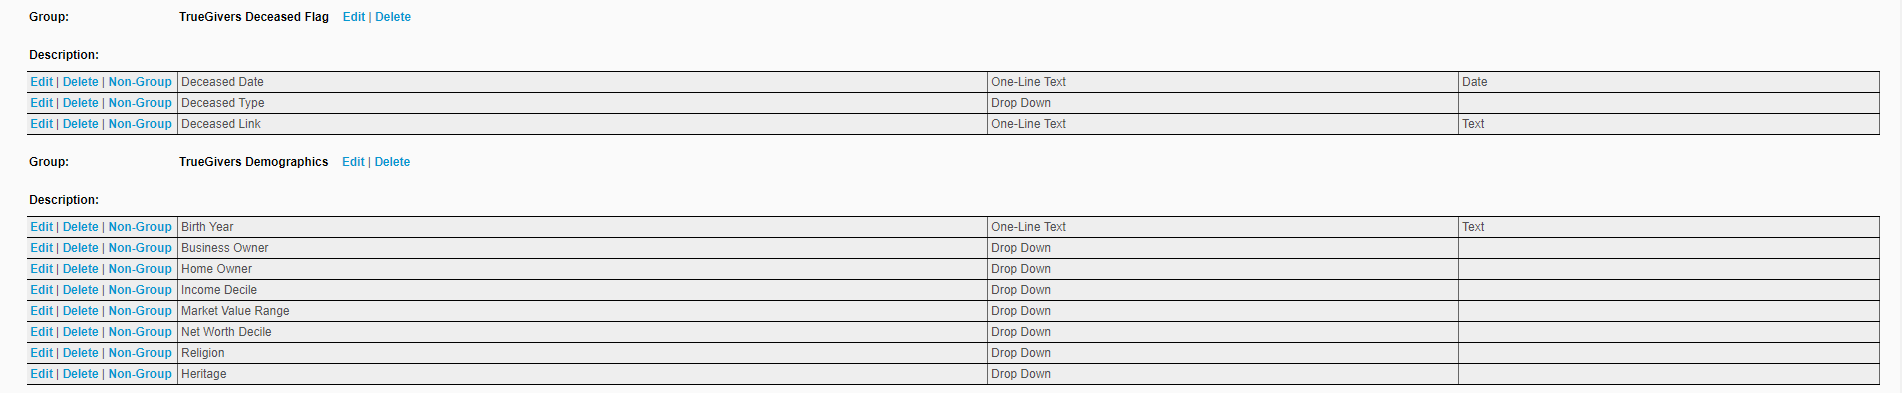
Repeat those steps to create Custom Groups until they are saved with their assigned custom fields. You can view all Fields and their Custom Groups in the table below.
When creating these custom fields, please make sure the custom field and its values are exactly as they are listed in the table below. Creating fields and values that vary from those listed will prevent those values from being synced.
|
Group
|
Field Name
|
Display Type
|
Data Type
|
Field Option
|
Code
|
|---|---|---|---|---|---|
| TrueGivers Deceased Flag | Deceased Type | Drop Down | Individual Household |
I H |
|
| TrueGivers Deceased Flag | Deceased Date | One-Line Text | Date | ||
| TrueGivers Deceased Flag | Deceased Link | One-Line Text | Text | ||
| TrueGivers Demographics | Birth Year | One-Line Text | Text | ||
| TrueGivers Demographics | Business Owner | Drop Down | Accountant Builder Contractor Dealer/Retailer/Storekeeper Distributor/Wholesaler Funeral Director Maker/Manufacturer Owner Partner Self-Employed |
A B C D E F M O P S |
|
| TrueGivers Demographics | Home Owner | Drop Down | Homeowner Renter |
Y N |
|
| TrueGivers Demographics | Net Worth Decile | Drop Down | Less than or equal to $0 $1 - $9,999 $10,000 - $24,999 $25,000 - $49,999 $50,000 - $99,999 $100,000 - $249,999 $250,000 - $499,999 $500,000 - $999,999 $1,000,000 - $1,999,999 $2,000,000 + |
1 2 3 4 5 6 7 8 9 10 |
|
| TrueGivers Demographics | Market Value Range | Drop Down | $0 - $49,999 $50,000 - $99,999 $100,000 - $149,999 $150,000 - $199,999 $200,000 - $249,999 $250,000 - $299,999 $300,000 - $399,999 $400,000 - $499,999 $500,000 - $749,999 $750,000 - $999,999 $1,000,000 Plus |
1 2 3 4 5 6 7 8 9 10 11 |
|
| TrueGivers Demographics | Income Decile | Drop Down | Less than or equal to $39,999 $40,000 - $69,999 $70,000 - $99,999 $100,000 - $129,999 $130,000 - $174,999 $175,000 - $249,999 $250,000 - $399,999 $400,000 - $749,999 $750,000 - $999,999 $1,000,000 + |
1 2 3 4 5 6 7 8 9 10 |
|
| TrueGivers Demographics | Religion | Drop Down | Buddhist Catholic Hindu Muslim Jewish Other Asian Religions Lutheran Mormon Eastern Orthodox Protestant |
1 2 3 4 5 6 7 8 9 10 |
|
| TrueGivers Demographics | Heritage | Drop Down | African American East Asian South Asian Central Asian Mediterranean Native American Polynesian Middle Eastern Western European Eastern European |
1 2 3 4 5 6 7 8 9 10 |
When you are all done your new Custom Fields and Custom Groups should look like this:
Are you an existing NeonCRM customer?
Register to start your integration between TrueGivers and NeonCRM, and keep your database updated automatically!
Not a NeonCRM User? Sign up today!
Request a Free Trial and Demonstration to try NeonCRM!