Overview
The TrueGivers and DonorPerfect integration provides automatic updates to your DonorPerfect accounts. These updates include address standardization, move addresses, and identified non-mailable addresses. The default process with the integration is to update your Address and Address2 fields. These are the appropriate fields for the data being updated.
When preparing for a mailing, some mailhouses require that your address and address2 data be listed on a single line. TrueGivers does have a setting that automatically updates these addresses into a single line, but DonorPerfect also has an option for your to format your addresses this way during your mail merge. You can read DonorPerfect's guide for Mail Merge here: https://softerware.my.site.com/dpcommunity/s/article/Mail-Merge-Guide
Continue reading below to find out how to edit the Mail Merge to use a single Delivery Line.
Prepare your Mail Merge
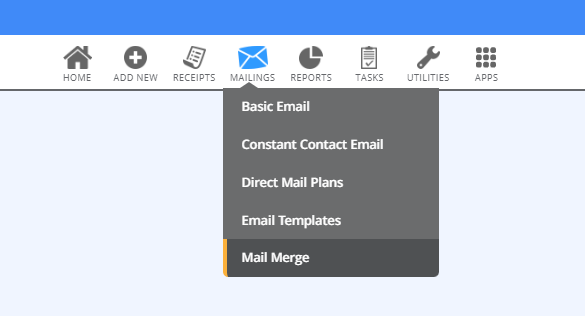
To create your Mail Merge file, you can begin by logging into your DonorPerfect account. Then, click the Mailings icon in the top header bar. A drop down will appear, and you should click Mail Merge.
On Mail Merge page, you should take the steps you normally would to create a Mail Merge file. In the Set Address Options section, click Apply to add any filters to this file. This could include excluding bad addresses or deceased persons.
Once you are done with your filters, you can then prepare your Export Template in the Set Mail Merge Options section. If you have a Export Template that you always use and you will always want to use a single address line, then you can choose your Export Template, by clicking the dropdown. Then click Edit Template.
If you would prefer to create a new Export Template, then click Add New Template.
Whether you click Edit Template or Add New Template, a new screen will appear. If you are adding a new template, make sure you name the template in the Template Settings section. We recommend something like One Line Address Template.
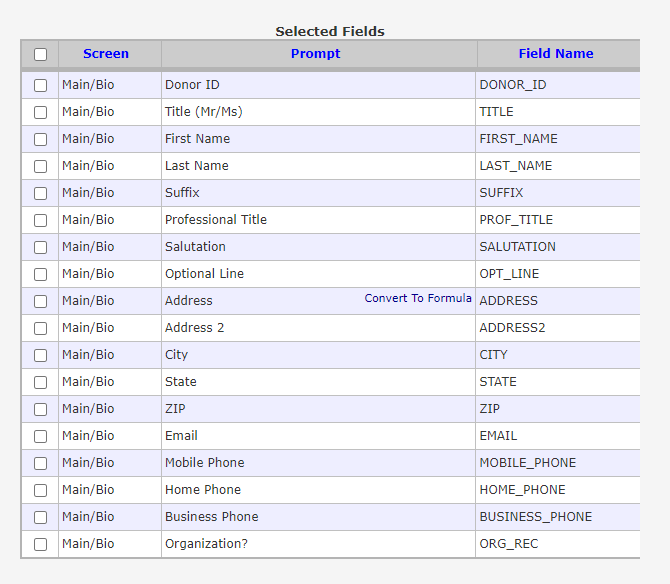
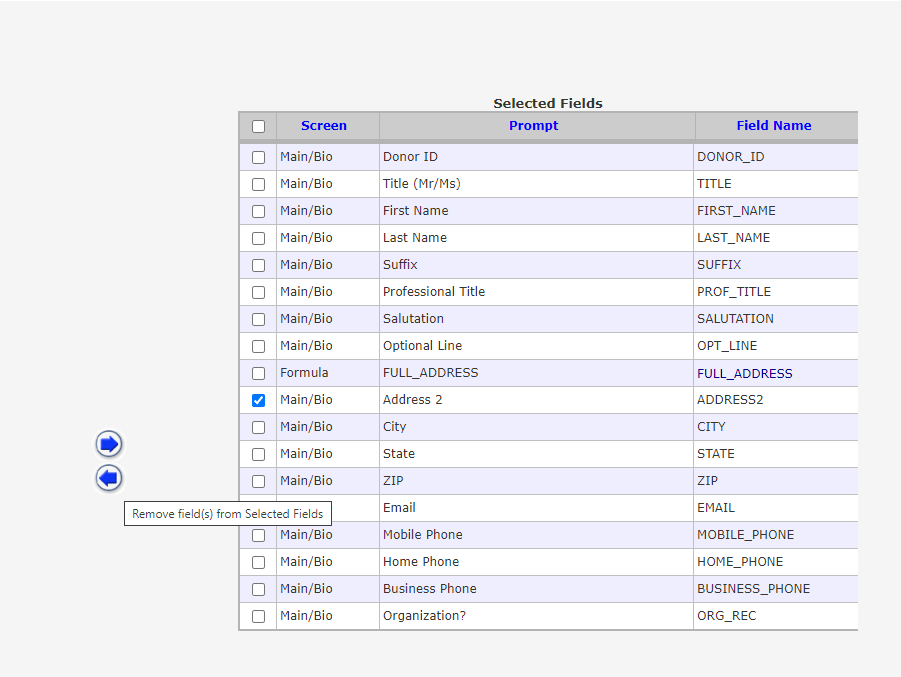
On this page, you'll want to navigate to the Selected Fields on the Right. These are the fields that will be included in your Export Template. If you need to add any additional fields, you should do that now. You will want to make sure that Address is listed in the Selected Fields.
To create the One Line address, you'll need to hover over the Address field in the Selected Fields section. You'll see "Convert to Formula" appear. Click Convert to Formula.
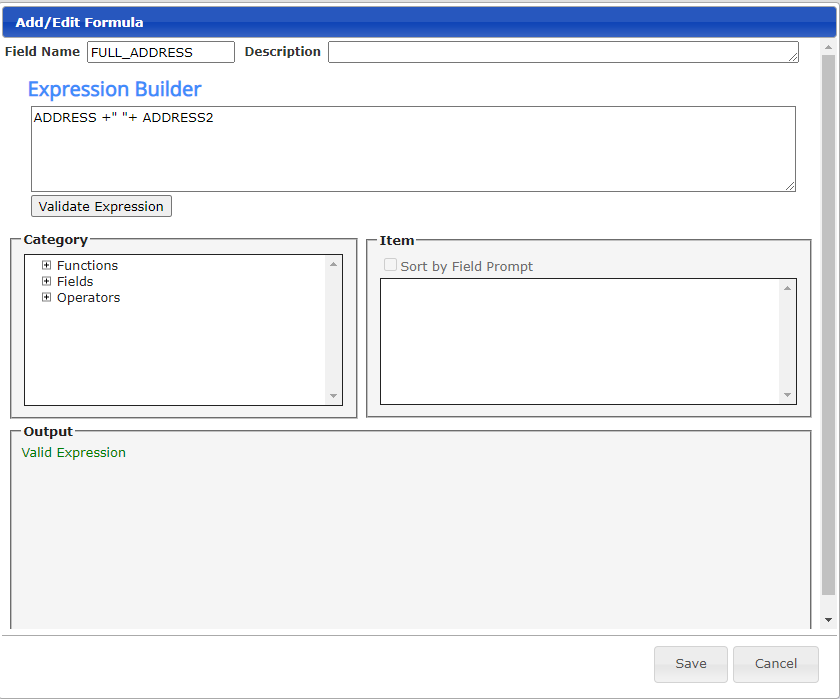
On the Formula page, you'll need to name the formula. We recommend FULLADDRESS or FULL_ADDRESS, but you can name it whatever works best for you. You can also add a description.
In the Expression Builder, you'll want to type in the following formula:
ADDRESS +" "+ ADDRESS2
That indicates that you want the ADDRESS field data and the ADDRESS2 data separated by a space. If you use ADDRESS3, you can add that as well by using +" "+ ADDRESS3 at the end of the formula above.
When you have entered in the formula, you'll need to click Validate Expression. If you have entered the formula in successfully, the Output section will say "Valid Expression". You can then click Save.
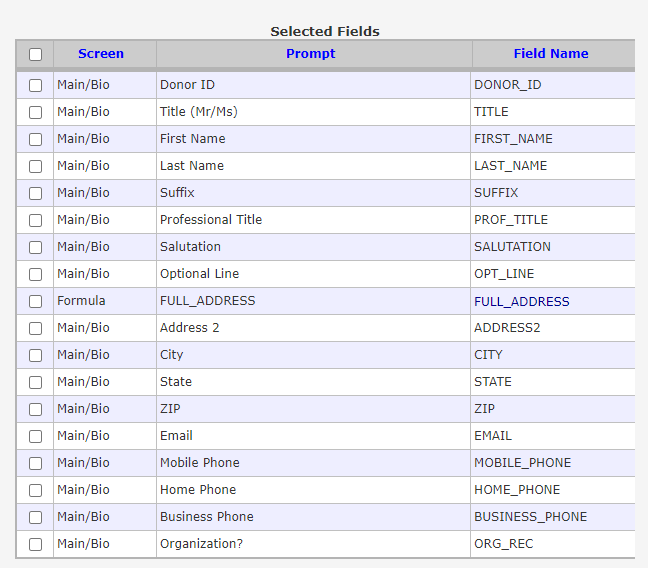
You'll be returned to the export template page once again. On this page, you'll note that the formula you just created is now listed in place of the ADDRESS field.
The next step will be to remove the Address 2 field from the Selected Fields. You'll want to remove this so that it does not appear in your export file.
Check the box to the left of Address 2. Then click the arrow pointing left that is between the Available Fields and Selected Fields sections. Once you click the arrow, Address 2 will be removed from your Selected Fields.
Confirm all of your selected fields once more. Add or remove any that you deem necessary. Once you are confident that you are all done, you can click the Save and Close button located in the top right of the Export Template screen.
You'll be brought back to the Mail Merge Setup page. On this page, you should see the export template you edited or the export template you created listed in the Choose your Export Template.
When you are ready, you can either click Export Mail Merge File or click Instant Merge.
Any Address and Address 2 data will be located in a single field on your Mail Merge file.

